Set Parts and Parameters
Point Parameter Definition and USage
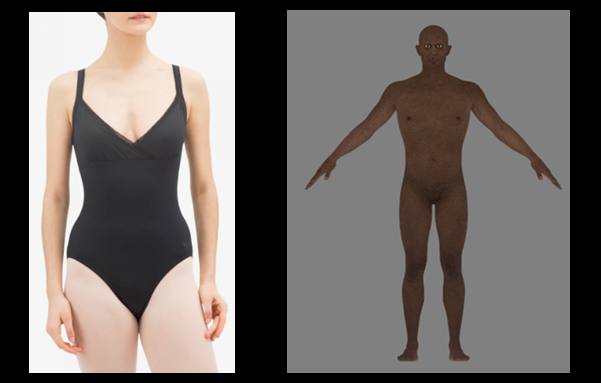
Clothy3D's method of dressing a cloth on various characters with various shapes is very similar to the method used by tailors to pin a cloth on a mannequin.
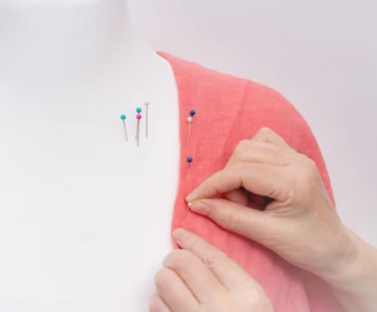
The "pins" used in Clothy3D are called shape control points and skin transfer points, which are used respectively to adapt a cloth to the base character's body and transfer skin weights from the base character to the cloth.
These points are on the cloth. Each point corresponds to a character vertex, so the vector from the corresponding vertex to the point is very similar to a "pin", the vector's direction is the normal of the character mesh at the vertex, and the length of the vector ("pin") determines how far (or high) the pinned cloth point is from the character's skin (body surface).
If you convert a skeletal cloth model to be used on characters with compatible skeletons, you normally just need to set the parameters for shape control, and do not need to set body parts on the cloth and the parameters for skin transfer. Examples include converting UE 4 and 5 clothes.
To find the points correctly by calculation, the character vertices are classified to the following classes or parts:
- Head
- Torso
- LEG_FOOT_R and LEG_FOOT_L (for Inside Tight, Inside Loose body types), or LEG_FOOT (for other body types)
- ARM_HAND_R and ARM_HAND_L
- F_THUMB_R and F_THUMB_L
- F_INDEX_R and F_INDEX_L
- F_MIDDLE_R and F_MIDDLE_L
- F_RING_R and F_RING_L
- F_PINKY_R and F_PINKY_L
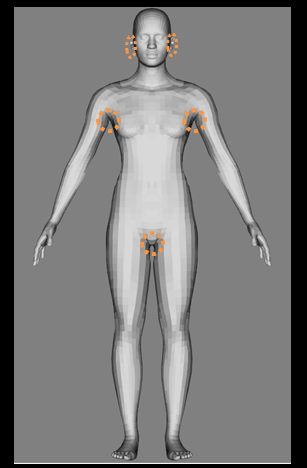
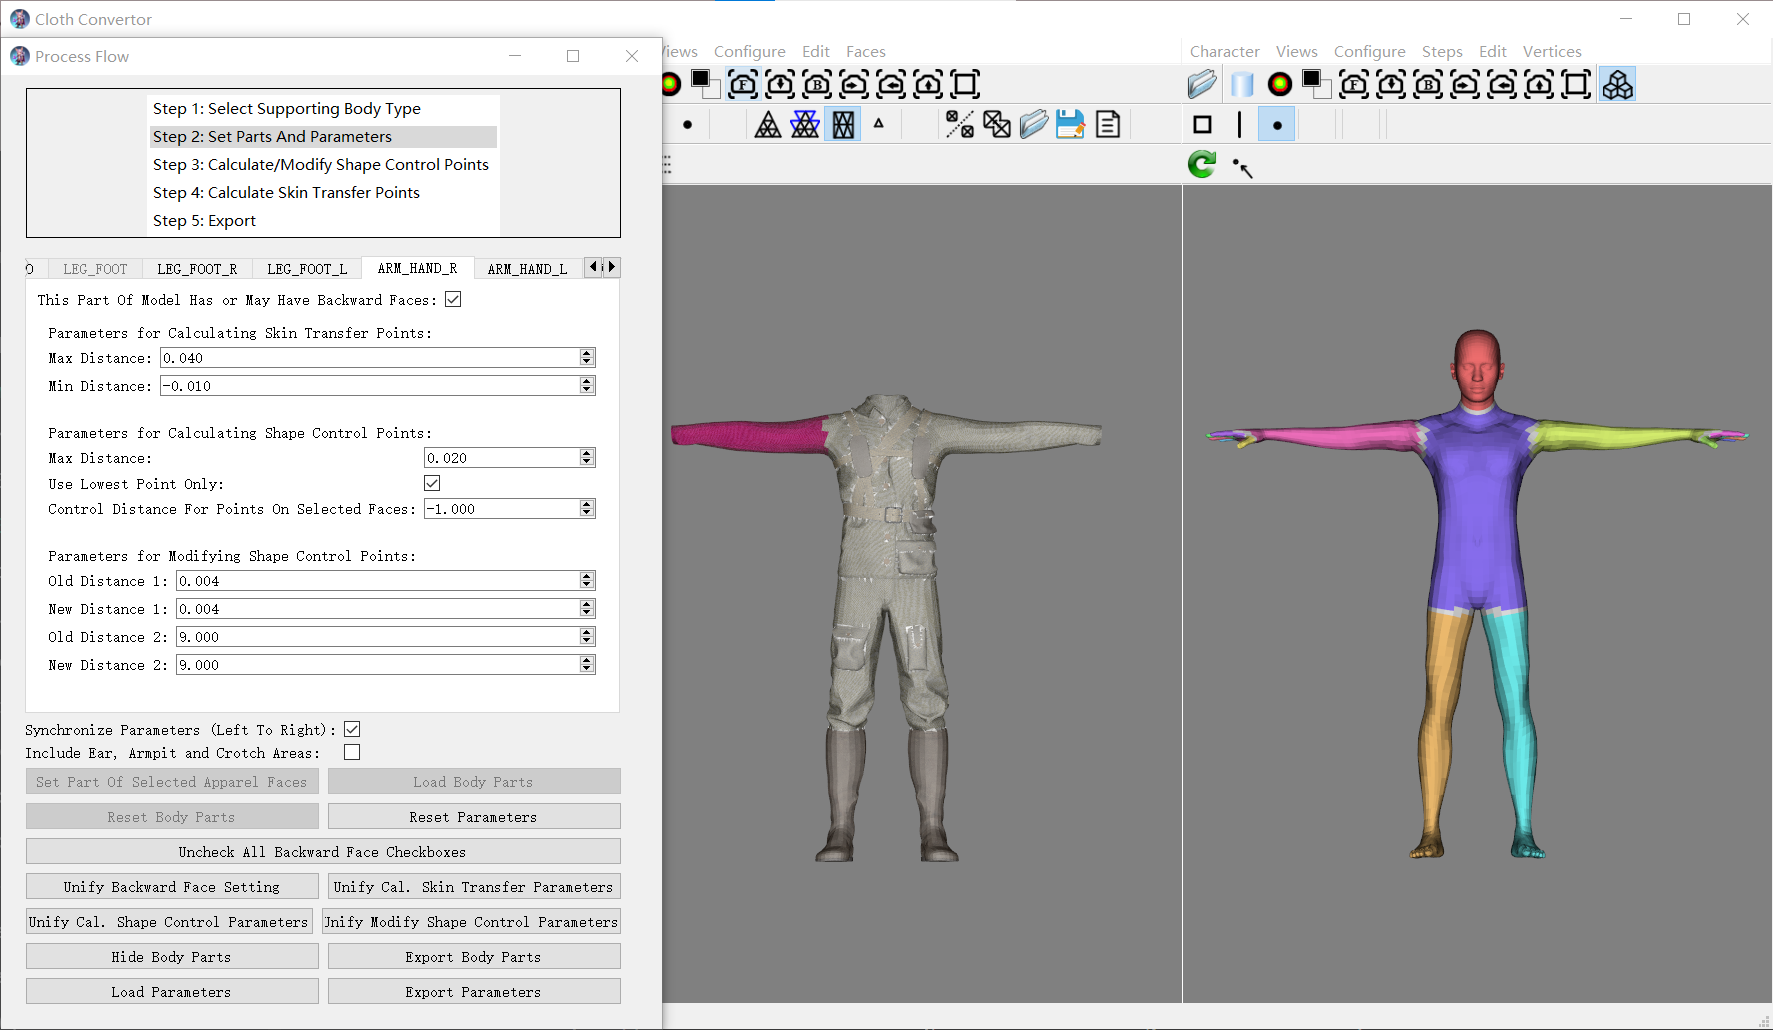
To see this, click the "Show Body Parts" button. You can see, in the right viewport, the character vertices are displayed with different overlaid colors as shown in the following figure.
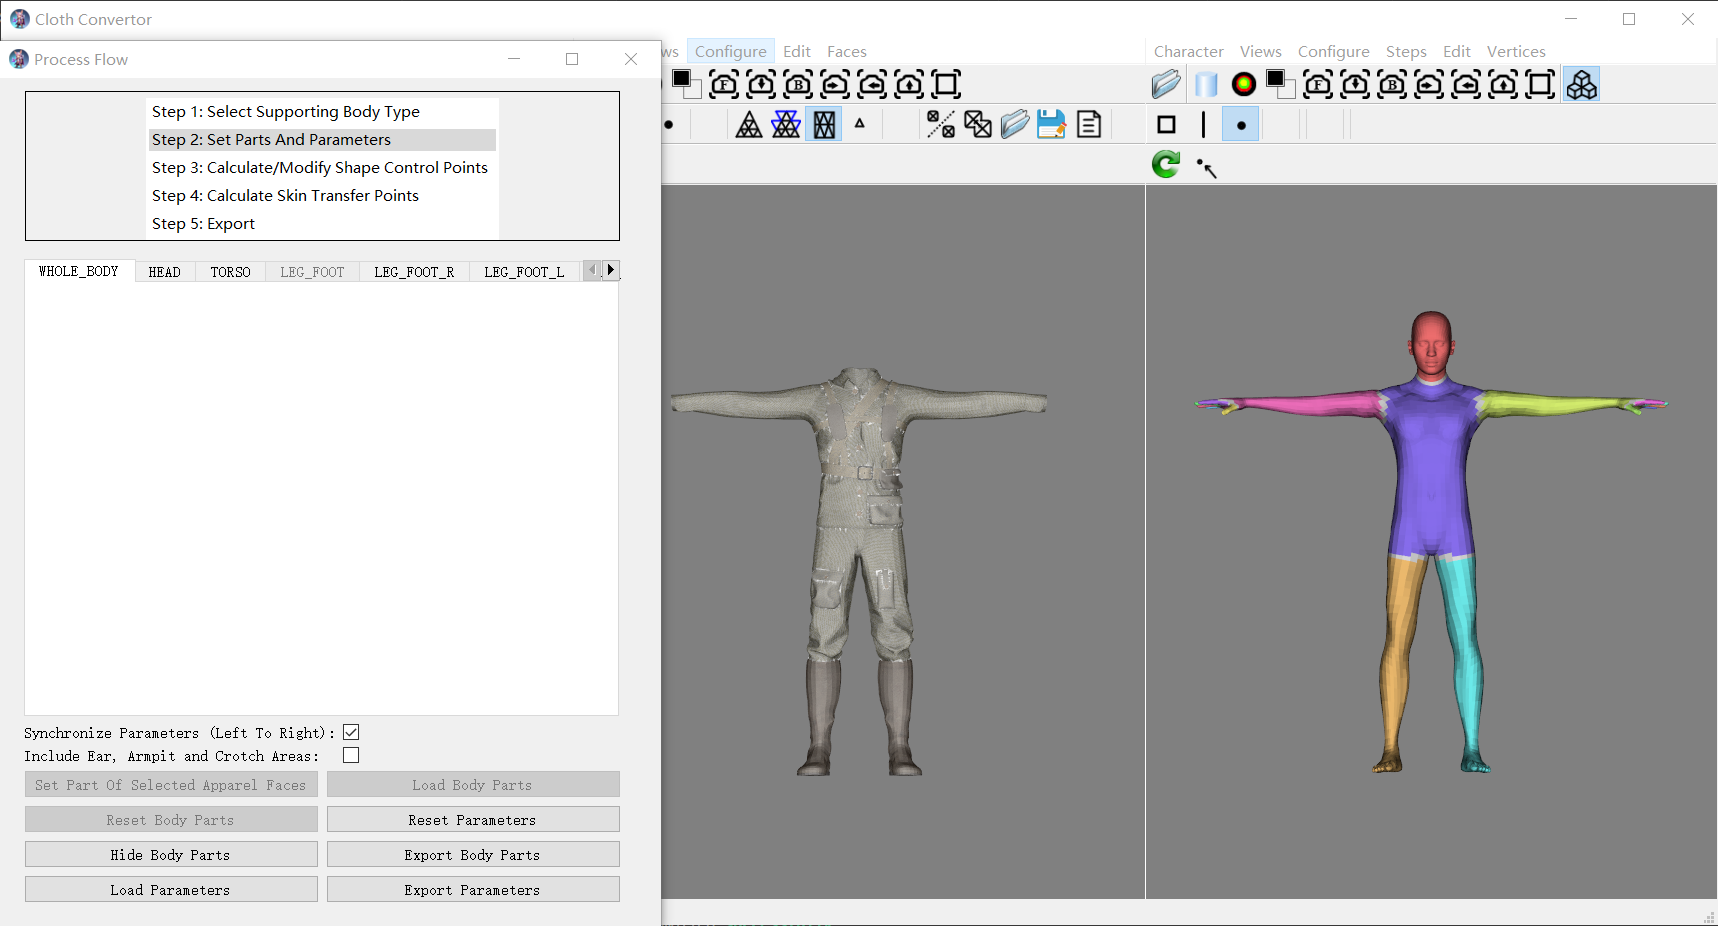
Each color represents one class.
You can also see, in the middle viewport, the cloth vertices are displayed with no overlaid colors. This is because all the cloth vertices have not been classified yet, come with a default class "WHOLE_BODY".
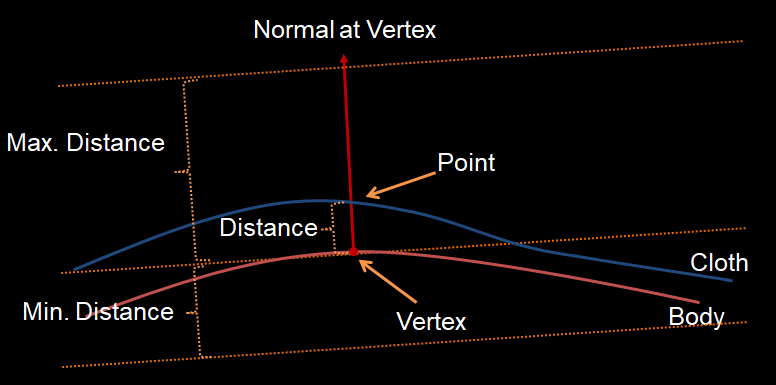
The configuration window allows setting parameters for each class, which are used to calculate (find) the shape control and skin transfer points on the cloth. For each character vertex, its corresponding points on the cloth are found using the following steps.
1. find shape control and skin transfer points
- firstly find the parameters corresponding to the class of the vertex;
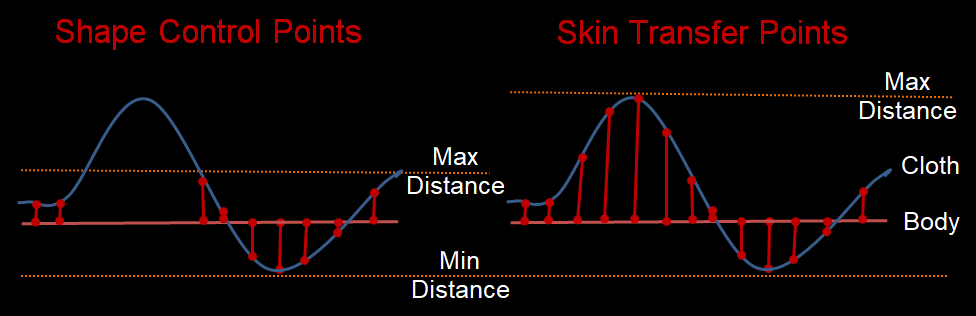
- then find all the points on the cloth using the parameters such that:
- all the points are on the normal direction at the vertex;
- the distance from the vertex to the point is in the range of ("Min Distance", "Max Distance").
The follows should be noted:
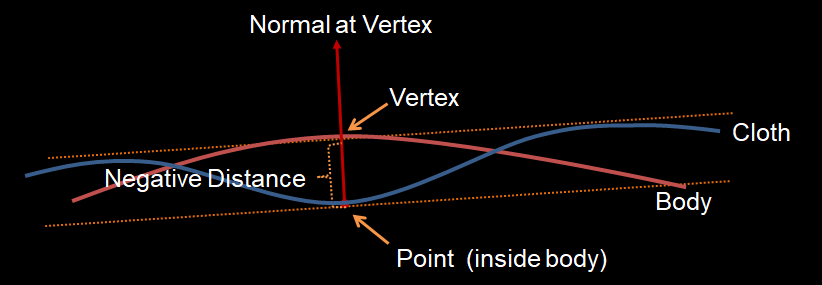
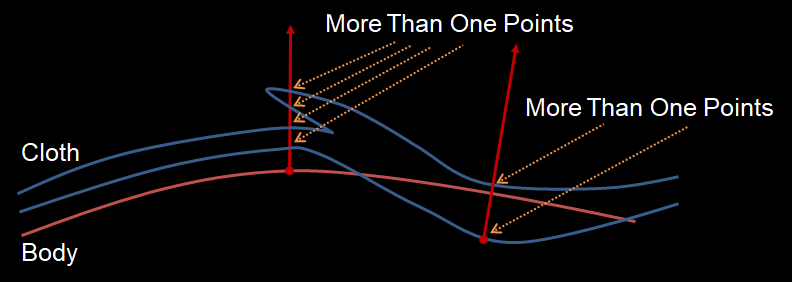
- if a cloth point is inside the body, its distance is negative, as shown in the following figure. This is possible as the body may not have been fit to the cloth very well by the "Match Mesh To Model" operation.
- if the cloth consists of multi layers or is double-sided or has folds, more than one points may be found for a character vertex, as shown in the following figure:
Shape control points and skin transfer points use a common "Min Distance" parameter, but different "Max Distance" parameters. The recommended setting for these parameters are:
- "Min Distance" should be set to ensure all the model parts inside body are "pinned";
- "Max Distance" for skin transfer points should be set to ensure most or all the model parts outside body are "pinned";
- "Max Distance" for shape points should be set to ensure only the model parts close to body are "pinned.
2. filter shape control points
The "Control Distance For Points On Selected Faces" parameter is used in conjunction with selecting faces of the cloth:
- if you set this parameter to -1, then all the points found on the selected faces are filtered out, i.e. not used;
- otherwise the distances of all the points found on the selected faces are set this parameter.
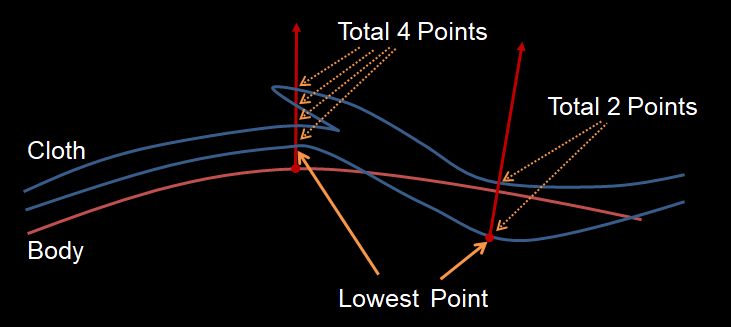
The shape control points are further filtered in the case that the cloth is layered or double-sided or has folding:
- If more than one points are found in previous step and if "Use Lowest Point Only" is checked, only the lowest point is used.
If the "Include Ear, Armpit and Crotch Areas" checkbox is not checked, there are no points corresponding to the vertices of character in these area.
If "Synchronize Parameters (Left To Right)" checkbox is checked, the parameters on left side of character is automatically synchronized to those on the left side.
3. Modify Shape Control Points
When dressing the cloth to a character, a modified version of the shape control points is used. The modification is on the distance of each point as follows:
- if distance is less than "Old Distance 1", then modified distance is "New Distance 1";
- if distance is larger than "Old Distance 2", then modified distance is "New Distance 2";
- otherwise modified distance is (distance - "Old Distance 1") * ("New Distance 2" - "New Distance 1") / ("Old Distance 2" - "Old Distance 1");
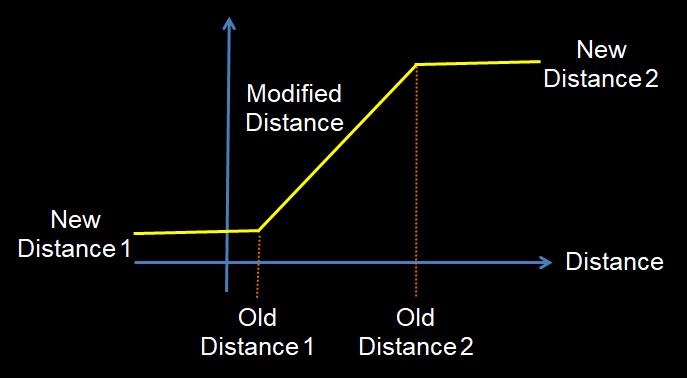
The "Old Distance 2" and "New Distance 2" parameters must be set to larger than the "Old Distance 1" and "New Distance 1" parameters respectively.
The reasons for using the modified points instead of the original ones include:
-
ensure cloth always out of body
The cloth may not have been fit to the body perfectly, and some vertices of the cloth may be inside the body. By setting "Old Distance 1" and "New Distance 1" to positive values, the cloth vertices inside body are pull out, so the dressed cloth is ensured to be out of body and at least "New Distance 1" above the body surface;
-
make cloth has a constance with the body
By setting "New Distance 1" and "New Distance 2" are a same positive value, the dressed cloth has a constant distance above the body surface. For example, this can be used to dress nylon stockings or pantyhose for woman.

Handle Issues
For most cloth and character models, the method above works fine. But if the models have double-sided meshes or folds, it may find "trouble" points which are incorrectly "pinned" to wrong body parts as shown in the following figure.
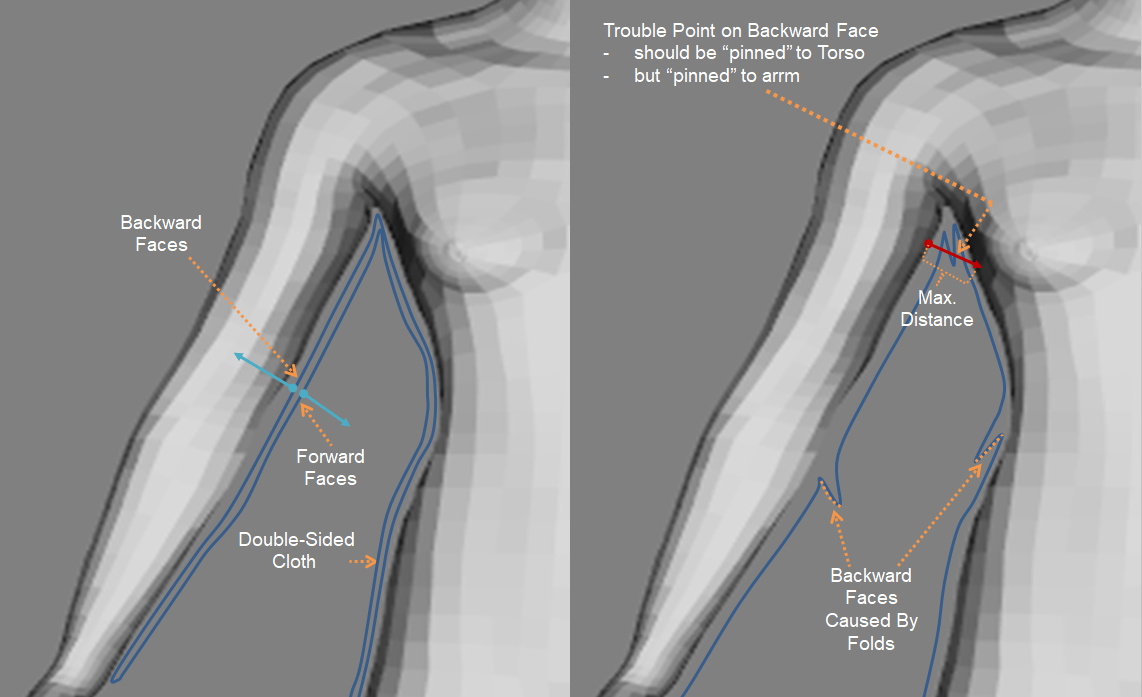
The root cause is a type of faces called "backward faces" whose normals points inward to the body surface.
This issue is handled using the following described "Set Parts" step.
Work Flow
The follows shows a general work flow of setting the parts and parameters:
Uncheck all backward face checkboxes
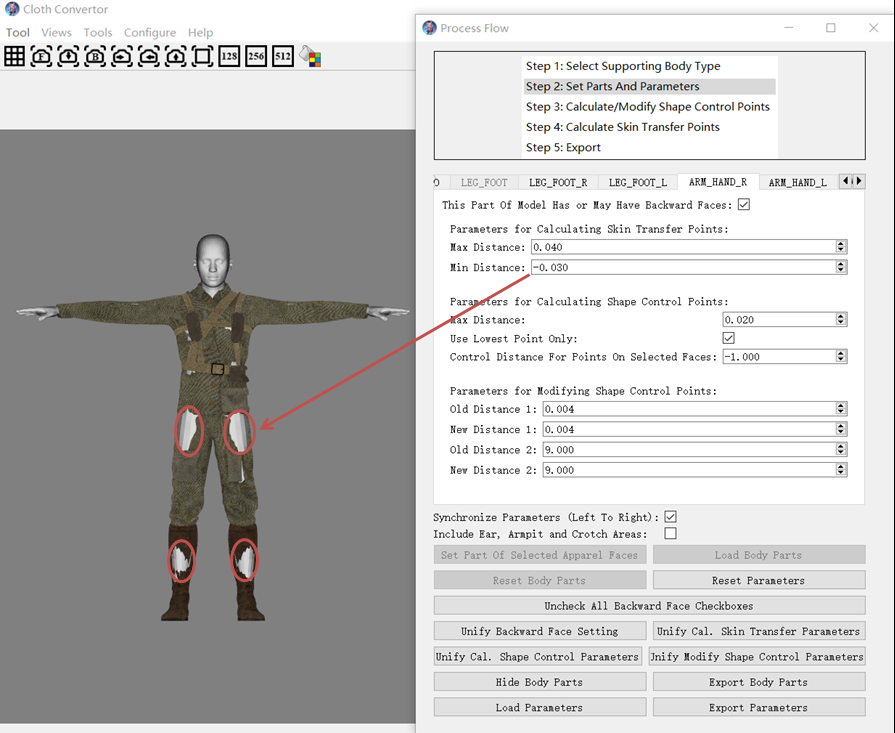
Each part has a "This Part Of Model Has or May Have Backward Faces" checkbox as show in the following figure.
For Character Convertor, the default setting for all the checkboxes are unchecked, so just use the default setting.
For Cloth Convertor, the default setting for the checkboxes of the HEAD, TORSO, ARM_HAND_R, ARM_HAND_L, LEG_FOOT, LEG_FOOT_R and LEG_FOOT_L parts are checked, so click the "Uncheck All Backward Face Checkboxes" button to uncheck them.
Check and set parts and backward face setting
Most cloth models has or may have backward faces in the TORSO, ARM_HAND_R, ARM_HAND_L, LEG_FOOT, LEG_FOOT_R and LEG_FOOT_L parts, and has no backward faces on finger parts, this is the default backward face setting for these parts when the Cloth Convertor is used.
The follows shows the procedures when the character is in T and A pose and the character and cloth have normal shapes. Otherwise, customization may be needed.
In each procedure, check and set parts and backward face setting for the processed parts as follows:
It should be noted that in each procedure:
- all the parts must be set even if only one part has or may have any backward faces unless only one part exists;
- if the middle model does not have the parts, skin this procedure.
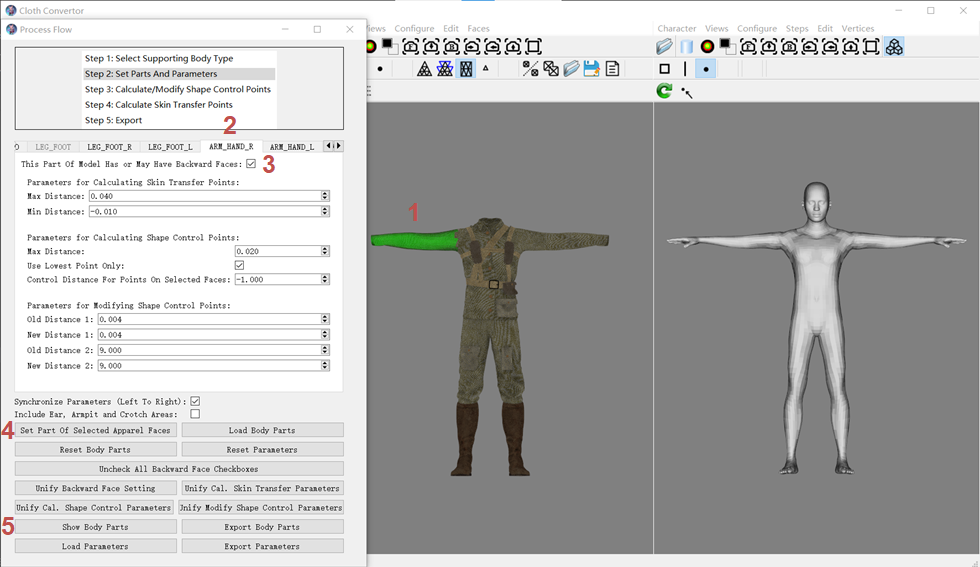
As an example, the follows shows the steps to set the "ARM_HAND_R" part by manual cloth vertex classification.
-
Select a tab page
In the example, select the "ARM_HAND_R" tab page.
-
Check the "This Part Of Model Has Backward Faces" checkbox;
-
Click the "Set Part Of Selected Apparel Faces" button to classify the selected vertices to the "ARM_HAND_R" class, the green region will be gone;
-
Click the "Show Body Parts" button to check the result: the color of the classified vertices should be the color of the "ARM_HAND_R" class.
Use default point parameter setting
If the middle model is closely wrapped to the base character body, use the default setting. Most clothes in daily life are closely wrapped to the base character body if they are correctly matched.
Set point parameters
If the middle model is not closely wrapped to the body, you need to set the parameters correctly.
The following figure shows an example of decreasing the "Min Distance" parameter to ensure the model parts inside the body are correctly "pinned".
Reset Parameters
Clicking this button resets all parameters to default values stored in the part_pars_default_cloth_convertor.pars or part_pars_default_character_convertor.pars file in the "HDataGenerated\L\base" folder under the installation folder oof the tool. You can customize the default values by exporting customized parameters to these files.
Reset Body Parts
Clicking this button classifies all vertices to the default "WHOLE_BODY" class.
Uncheck All Backward Face Checkboxes
Clicking this button unchecks "Have Backward Faces" checkboxes of all classes.
Unify Backward Face Setting
Clicking this button sets the "Have Backward Faces" option of the currently selected class to those of all classes.
Unify Cal. Skin Transfer Parameters
Clicking this button sets the vales of the "Parameters For Calculating Skin Transfer Points" of the currently selected class to those of all classes.
Unify Cal. Shape Control Parameters
Clicking this button sets the vales of the "Parameters For Calculating Shape Control Points" of the currently selected class to those of all classes.
Unify Modify Shape Control Parameters
Clicking this button sets the vales of the "Parameters For Modifying Shape Control Points" of the currently selected class to those of all classes.
Export and Import Settings
You are recommended to save your settings frequently by exporting to files which can be used to restore the setting by importing. For example, by importing the files, you can repeat the process exactly, and fine-tune the setting to fine-tune the results.
When you process another similar cloth, you can just set the parts, and re-use all or most parameter settings by import a parameter file.