Dress3D Guide
Dress3D is a tool to dress avatar and export rigged clothes and base characters. It is used in the following steps.
1. Import Original Base Character
Import the character to the middle scene.
2. Import Interchangeable Character and Clothes
Find the interchangeable character corresponding to the original base character, Import it to the right scene;
Import all interchangeable clothes to right scene.
2.1 Transfer Original Cloth Bones And Skin Weights (optionally)
If the original cloth model of an imported interchangeable cloth is a skeletal model whose skeleton is compatiable with the skeleton of the dressed caharacter, then a dialog window is pop up to ask if you allow merge its skeleton to the skeleton of the dressed character. If these two skeletons are compatible, they are merged. Then another dialog window is pop up to ask if you wants to use the original skin weights, and will transfer original skin weights if you wants.
If the two skeletons are not compatible or you do not want to use the original skin weights, then the interchangeable cloth is imported as if it was converted from a static model.
2.2 Add Cloth Bones (optionally)
When a cloth is converted by Cloth Convertor, some vertex groups may be set to transfer same skin weights for each group from a vertex of the interchangeable character.
When importing such a interchangeable cloth, for each group, the vertex of the interchangeable character is shown as a red ball in the right scene, and following dialog window is pop up to ask your selection:
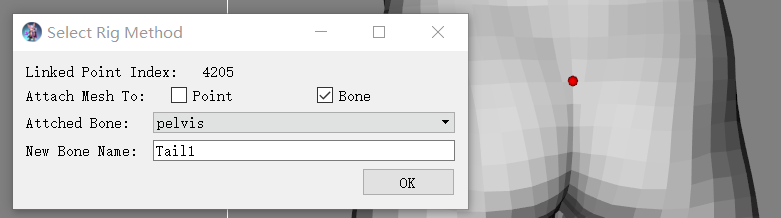
If you select to attach mesh to "Point", the skin weights of the vertex of the interchangeable character will be transfered to the group of vertices.
If you select to attach mesh to "Bone", then you need to select the attached bone.
If the "New Bone Name" shows a recommended new bone name, then you are recommended to create a new cloth bone to control this group of vertices. If you keep it or edit it, a new cloth bone will be created and attached to the "Attached Bone". The new bone's origin is at the center of the group of vertices, and has the same orientation with the "Attached Bone". You may check and adjust the bone later. If you do not want to create a new cloth bone, just clear the "New Bone Name".
If the "New Bone Name" is empty, then you are recommended to attach this group of vertices directly to the "Attached Bone". However you can still create a new cloth bone if you fill a new name.
2.3 Modify Shape Control Point Distances (optionally)
If the Ask For Modifying Shape Control Point Distances checkbox is checked, when loading a cloth asset, a dialog window is pop up to ask if if you want to modify the shape control point distances, and if you want, the following window is pop up in which you can enter the parameters, and these distances will be modified.

3. Edit Middle Model (optionally)
- Delete or hide meshes and faces hidden by the clothes in the right scenes using operations 1 2 3 4 5 6 7 8
- Adjust vertices or deform it to be inside the clothes in the right scenes
4. Copy Top Layer Cloth To Middle Scene (optionally)
Copy the top layer cloth from right scene to middle scene, and hide or delete it in right scene
5. Starting at the Next Layer cloth, process each layer cloth one by one as follows (optionally):
- Delete or hide meshes and faces hidden by the clothes in the right scenes
- Adjust vertices or deform it to be inside the clothes in the right scenes
- Copy the cloth from right scene to middle scene, and hide or delete it in right scene
6 Add Rigid Accessories (optionally)
A rigid accessory such as a weapon can be added as follows:
- Click a vertex of the model in the middle scene
- Import the accessory model as a static model to the middle scene
- A dialog window is pop up and select your options
7. Edit (Optionally)
During the process above, you can optionally edit the clothes and original character using any of the following operations in any order:
-
duplicate and copy, align, flip the meshes
-
translate/rotate/scale meshes using gizmo
8. Test (optionally)
Test Using Skeleton Editor
Test Using Mixamo.com
If the skeleton can be re-targeted to mixamo, export it to a fbx file, then upload it to mixamo.com, and try various animations there.
9. Export
Export meshes of the middle or right model to fbx files using or 1 or 2
Export meshes of the right model to asset files using [1] (/references/Edit_Faces/Processing_Flow/Export).